Memorizing a few of our favorite hotkeys can make working in your Zoom calls extra…
Sharing Video Clips in a Zoom Meeting
More frequently, we hear from clients that want to playback video as a portion or primary content for their events. We’re going to share some tips and best practices with you so that you can play back videos like a pro.
Zoom Screen Sharing Resolution Explained
Let’s start with a foundational knowledge of Zoom screen sharing so that we can better understand the limitations.
Zoom screen sharing is 1080p by default. This means that Zoom is capable of offering 1080 pixel lines of vertical resolution (1920 width x 1080 height = 2,073,600 pixels in a screen shared image). Understand that this is a maximum. Internet connectivity and performance may cause this quality to drop down so that Zoom may continue to provide the content.
By comparison, Zoom’s video feed from your webcam is 720p (that’s 1280 width x 720 height = 921,600 pixels per image). That’s a jump down from 1080p by over half.
Zoom provides an option to share video via screen sharing using the option to “optimize for video clip” or by using the advanced function in screen sharing to present a video through a Zoom player. Both options will step the screen sharing image quality down from 1080p to 720p, allowing for a much faster transfer of information and smoothing of the video playback via screen sharing. It takes the choppiness out of playback compared to not using this feature and sharing at 1080p, but it also loses half of the image quality resulting in an image that is not as sharp.
Zoom reviews this and some limitations in detail in their support article here. They recommend that videos that are played through screen sharing be optimized with a resolution of 1080p to avoid quality loss from this downsampling to 720p. Further, CPU load is increased with the effort of downsampling an image to send which may add to quality issues in sending and viewing.
Why does resolution matter?
The resolution of an image or video determines its quality on screen. The same video, rendered at 1080p and 720p and played side-by-side on the same display will look considerably different. The 720p image has less than half of the visual information or pixels than the 1080p image. Stepping down image quality in this way will result in less definition and a lower quality image. Text, especially fine and dense text, will appear blurry and hard to read. The edges of shapes will degrade.
Is this a big deal? Well, that depends on your use case and the content that you wish to share. Is the video you are playing live action or is it a recording of slides or still images? Not all .mp4 or video files are the same. Being aware of the following video playback options will help you decide which to use and when for best results.
Video Playback Methods
Having all of these options at your disposal will allow you to ensure that your attendees are viewing the best-possible image quality at all times. Some methods will bypass screen sharing all together. We’ll break down the tech details, the benefits and use case best practices for you.
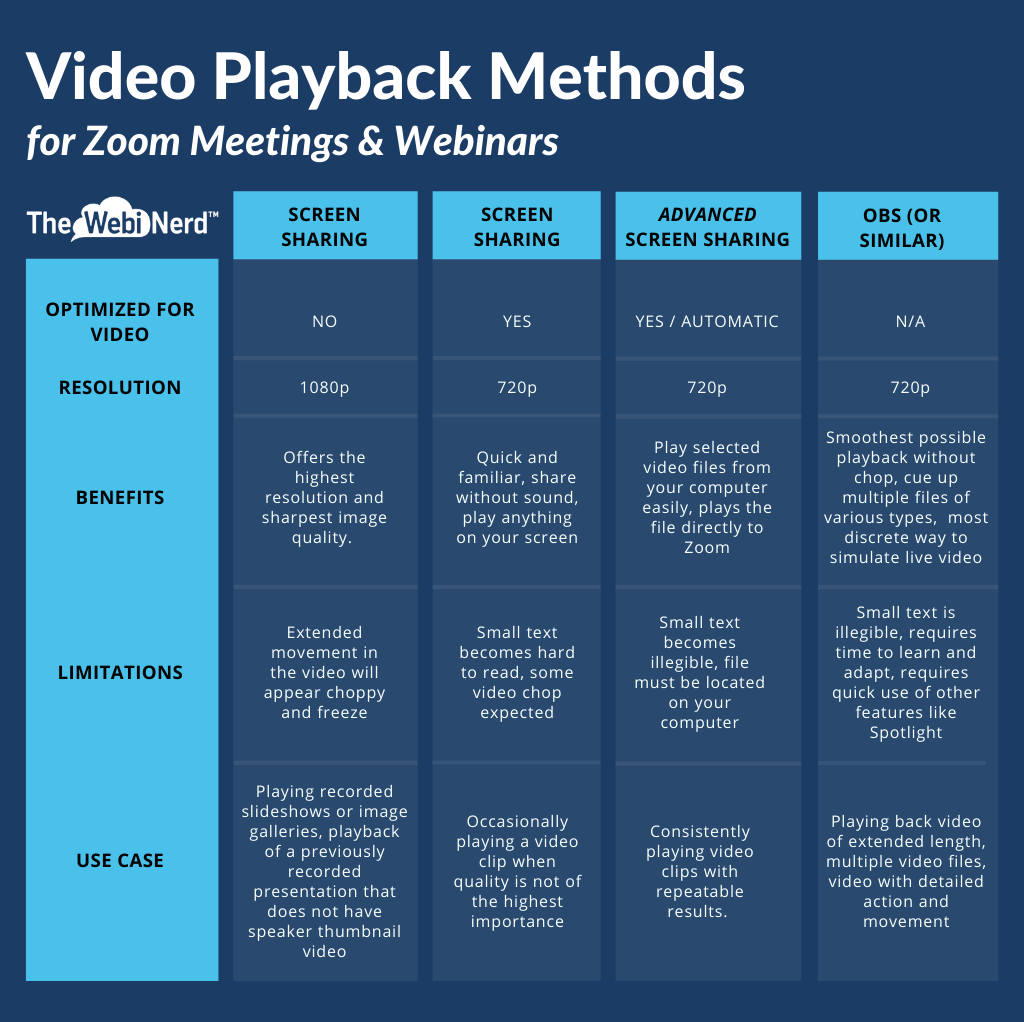
Video playback via screen sharing – Not Optimized
Because the images in the video file are actually still or use quick transitions, there is no need to optimize for video playback even though you are sharing a video file. We often use this method to share a looped slideshow prior to an event start as participants join. Add a bit of music and everyone knows they are in the right place and properly connected.
Video playback via screen sharing – Optimized for video clip
We often use the Zoom screen sharing advanced features to share a portion of the screen when using this method. This allows us to trim out the play button and frame the video just right in advance of the session. This method also allows you to share without sound if you wish to talk over the video playback. Remember to disable this option once the video playback is completed as it may cause other content you share to look fuzzy.
Video playback via Advanced Screen sharing
This is a newer option that Zoom has added in. We find it useful to use when video playback is required for some brief segments during an event. Results are consistent with this method so that you are confident that your attendees view as intended. Zoom provides a window for the video file with a play/pause button and volume control. Attendees can use the View Options menu to mute the video sound if needed. Close the player window to stop sharing.
Video playback via OBS (or similar tools)
Using OBS or similar tools comes with a lot of benefit, but some sacrifice. The quality of text appears to be even more adversely affected via this method while the smoothness of the video playback detail is enhanced. OBS allows for looping of content, playing of multiple sources simultaneously and with layers. Create multiple scenes and sources to navigate through your program with ease. Once you have adapted to using OBS, you have a lot of potential for adding interest to your use of Zoom including lower thirds and more.
Ya, so that’s a lot, huh? There’s a little bit more…
More Best Practices for Video Playback
Now that your options are laid out for you, choosing your most practical option may be more clear. Here are some other notes we want to share with you to make sure you provide your participants with an optimal experience when you share your video clips through Zoom.
Volume
Volume that is too loud or too soft is disruptive. If the listener cannot hear you or you are too loud at 50% volume on their device, we have a problem. Use the volume control of your player to manage the volume and test in advance with others to get a good idea of where the volume is to be set. Some videos are MUCH LOUDER than others. Test and test again! Volume control is one of the main reasons we prefer not to imbed videos in slides. OBS gives us great control over volume.
Attendee View
When you share your screen or content in Zoom, everyone viewing will see a green tab up top indicating that you are sharing the content and it will say your name. While you may rename yourself (next tip), the green tab is always there when screen sharing and no, you cannot customize the text other than by renaming yourself.
Change your name
We rename ourselves often. Usually, I opt for something like “[client or event name]-[my name]” to comply with branding. Your name will represent in the green tab when screen sharing and at the bottom-left of your video feed. Rename yourself and others to stay organized or be more discrete. We often use a period or simple character instead of a name, to minimize the impact the user name has on the screen.
Optimize for Content Sharing
You will want to do a lot of the work in advance to optimize your content for screen sharing in your virtual events, but once you’re in session, don’t share your entire display. Small packages take less effort to send. By reducing the amount of visual content that needs to be captured, you make it easier to send.We use the Advanced Share option to share a Portion of the Screen – this requires advance set up and blocking of the content windows on your screen. Again, rehearsal is crucial.
Ready to learn more – or just get some help?
Join us for Reboot and Rejoin on May 28th at 1:00pm PT / 4pm ET
We’ll be talking in more detail about sharing video through Zoom. It’s a little bit of lecture, a little bit of demonstration, and we take all your questions! Register here – it’s totally free!
Related Posts