With pre-recorded webinars, your speakers have the option to appear as flawless orators who rarely say “um” or “uh” while guiding your audience through dense content where there is no room for error. They can also eliminate the scramble to find a common schedule for busy presenters when you're working across multiple time zones. While they may rub against some of our best instincts as event organizers, pre-recorded or simulated-live webinars offer several clear benefits that may make recording your presentations in advance ideal for some of your virtual events.
Use OBS to Live Stream Pre-recorded Content
OBS stands for Open Broadcasting Software and is an open source video streaming tool. If you plan on playing multiple videos for your Zoom Meeting or Webinar or desire a smoother playback without skipping and stuttering, this is a great tool to use for seamless content and tighter transitions.
Thanks to contributing author, Erik Pumphrey, for his research and expertise.
1. Why use OBS?
OBS can offer more control of what shows on screen when sharing content, no more messy screen sharing with video controls on screen or having to outline a portion of your screen. The video sends directly through your video feed in Zoom, simply spotlight and everyone sees the video.
OBS is free to download and is available for use with Windows, Mac or Linux.
2. What is needed to stream video?
There are 2 applications and one add-on needed to stream video with audio: OBS to host the video, the OBS Virtual Camera add-on (allows Zoom and other services to receive the video feed from OBS), and Virtual Audio Cable (to share audio).
These 3 tools together allow us to queue and play videos with more control and stability. Video is sent to the webcam feed and the audio runs through the voice audio feed in Zoom. There is no delay as when you start screen sharing and call out at the top that someone is sharing their screen – folks may not even notice it’s not live.
- OBS: https://obsproject.com/download
- Virtual Cam: https://github.com/CatxFish/obs-virtual-cam
- Virtual Audio Cable: https://vb-audio.com/Cable/
3. Set Up
To use these tools together there are a few key settings to address. First download the three tools mentioned above. After you download and install all three tools, restart your computer and open OBS.
Audio Settings
View the File menu at the top left and select settings. Click to view “Audio” and scroll down to advanced. Set your “Monitoring Device” to “CABLE Input (VB-Audio Virtual Cable)” as pictured. “Disable Windows Audio Ducking” and click OK or Apply below.

Add a Video
Back on the OBS main screen, at the bottom center you will have “Sources” with a “+” and “-” sign at the bottom. You may simply drag and drop your file into this area or click the “+” to locate your file manually.
To add a video file manually, choose “Media Source”, locate and select the video file you wish to play.
Once the video is loaded as a source, use the eye icon to show or hide the playback of the video. Click on the video name to reveal a timeline under the video file to monitor duration of the playback.
Enable Video Sound
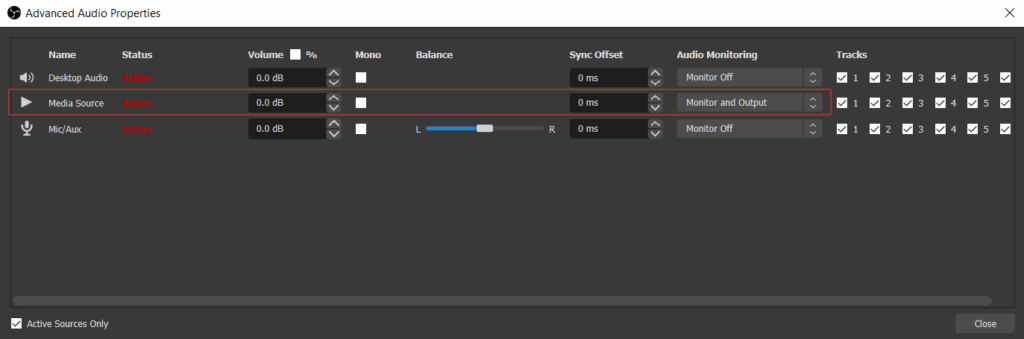
Now that folks can see your video, let’s make sure they can hear it too. Locate the “Audio Mixer” section of OBS at the bottom center and click the sprocket icon for settings (you can click any in this list) and select “Advanced Audio Properties”. Locate the file in the list of audio sources presented. Adjust the dropdown menu for the file under “Audio Monitoring” to ” Monitor and Output”. “Desktop Audio” and “Mic/Aux” should remain on “Monitor Off”.
Virtual Camera
View the Tools menu at the top of the OBS window and select “VirtualCam”. Click to start the VirtualCam at the bottom and you may also check the first option to “AutoStart” the VirtualCam. This allows OBS to send the video feed through your webcam to Zoom or other applications.
Zoom Setup
Open a Zoom meeting or webinar and locate the small up arrow next to your camera icon at the bottom left. Select “OBS-Camera” and your video will now be sent to Zoom instead of your webcam.

Next, select the up arrow next to your microphone at the bottom left and set your microphone to “CABLE Output (VB-Audio Virtual Cable)”. After you selected this, play the video from OBS and the video will play with audio streaming. This will route sound from OBS into Zoom. Use OBS to adjust the volume of the video if needed.

Tips
- While you have the setting above in place, your meetings participants cannot see or hear you as OBS has taken over your video and audio feeds. ** If you wish to speak over the video with audio from the video being heard, you may set “Mic/Aux” to “Monitor and Output”, but this may introduce unintended noise from you otherwise.
- You may not be able to hear the video yourself, but look to your microphone icon in Zoom to see the green level meter bouncing to confirm audio is sending.
- Bring in a second device or computer so that you can confidently monitor the video and audio when the video is playing.
- The video feed in Zoom is 720p and the screen sharing is 1080p resolution. This means that the image is stepped down considerably for video and may appear fuzzy or pixilated. Avoid small text or dense graphics. Design text in your videos as if they are going to be viewed on a smartphone screen for best clarity.
- Use the Zoom spotlight video tool to highlight the video for everyone to be sure they see what you want them to.
- OBS can be used for much more than playing back video. Try adding an image file for a lower third over your video feed. We’ll offer more tips like this soon.
4. Pros and Cons.
We feel the pros outweigh the cons which include time to set up and test OBS and the requirement of additional software.
PROS:
- Smoother connection feed which will have less lag or latency in your video playback.
- Queue multiple videos using OBS sources or scenes.
- Transition between videos quickly and easily without having to worry about screen sharing.
- Audio has shown to be very clear.
- Attendees have a cleaner viewing experience inside a meeting since the spotlights can be better controlled.
CONS:
- Streaming from OBS is not a good solution for dense text or detailed slides.
- Video feed is 720p and screen share is 1080p.
- Since there are more steps required, there is the possibility for error, making it necessary to double check to make sure everything is working prior to your meeting.
- We recommend regular testing and upkeep to ensure a smooth experience.
If you want to do more to amplify your online events, we’re here to help. Schedule a free consultation or reach out and let’s do something great together.
Related Posts